
TL;DR
Acoustic dampening in small spaces isn’t just about foam — it’s about smart placement and reducing both reflections and noise leaks. Moving your rig to a closet with proper ventilation can drastically cut noise, but always prioritize airflow to prevent overheating.
Ever tried recording in a tiny closet and ended up with a muddy, boxy sound? Or worse, a noisy rig that keeps your neighbors awake? The secret isn’t just in buying foam or blankets, it’s about where you put your gear and how you treat that space. It’s about where you put your gear and how you treat that space. For more tips, check out Moleopedia for insights on room acoustics and setup.
This guide cuts through the noise—literally—by showing you how to dampen sound effectively, place your rig smartly, and turn a cramped closet into a quiet, focused recording nook. Whether you’re a podcaster, voice-over artist, or streamer, you’ll learn practical tricks to get clear sound without breaking the bank.
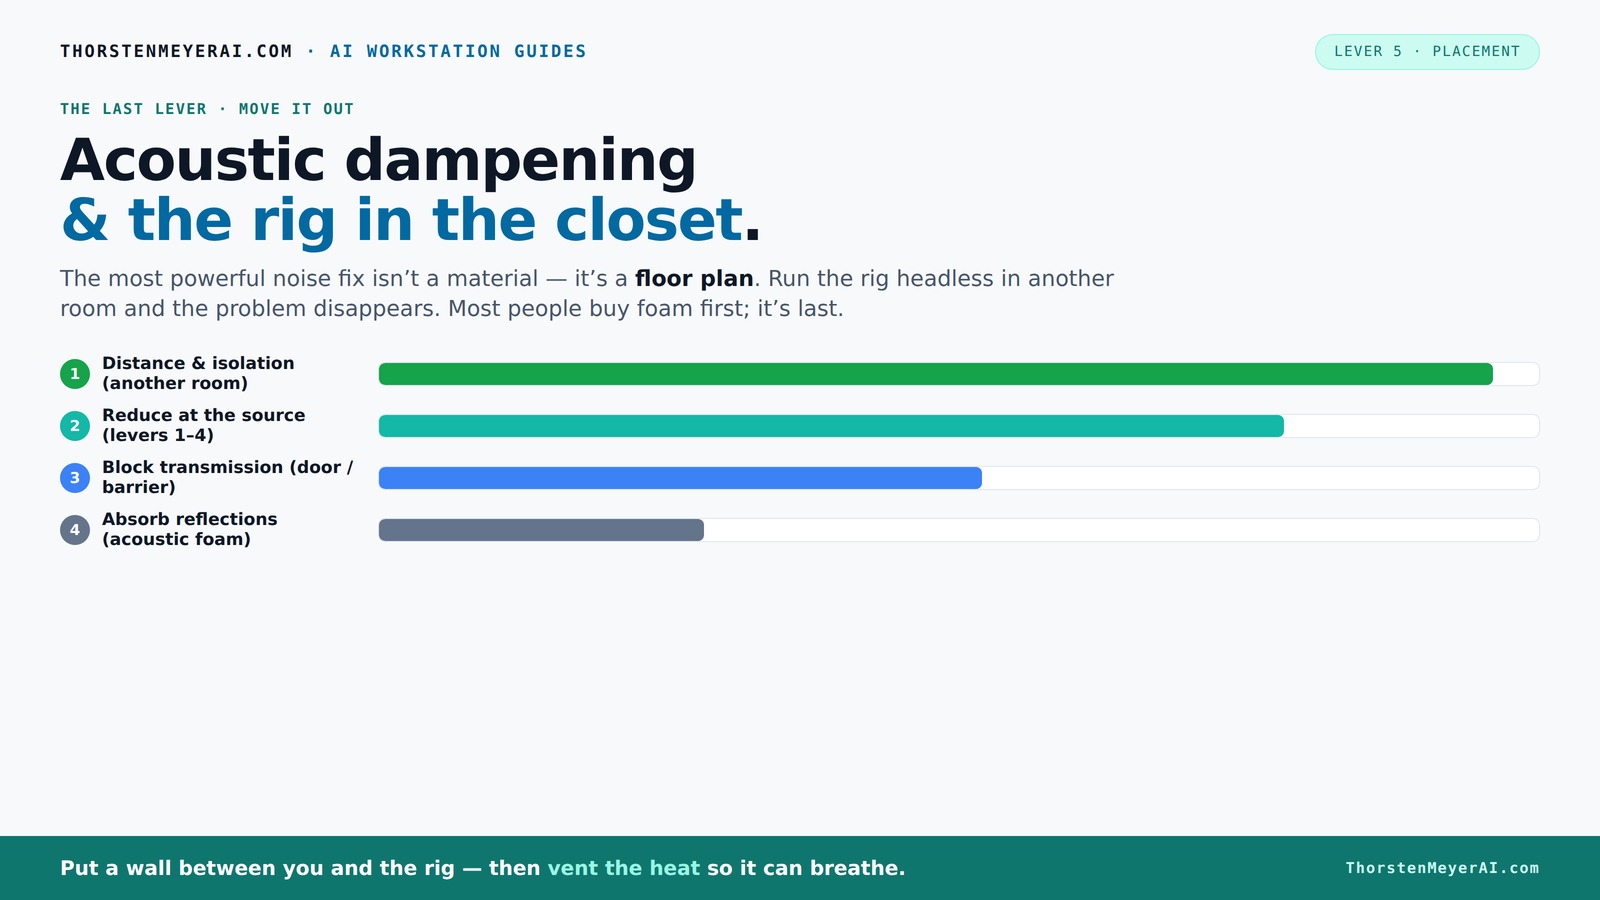
Acoustic dampening
& the rig in the closet.
The most powerful noise fix isn’t a material — it’s a floor plan. A rig you can’t hear because it’s in another room beats any amount of foam. Tap the approaches in Part 1 to see what actually works.
(another room)
(levers 1–4)
(door / barrier)
(acoustic foam)
Contain the noise, not the heat
Key Takeaways
- Prioritize moving your rig into another room or closet before buying foam or panels; distance is the most effective noise reduction.
- Use a combination of reflection points—mainly ceiling, walls behind the mic, and door treatment—for a balanced sound.
- Seal gaps at the door and add soft materials on the floor and ceiling to reduce room tone and reflections.
- In small closets, broader wall coverage often outweighs corner bass traps for overall sound clarity.
- Always provide ventilation for a closet rig to prevent overheating and maintain performance.

Focusound 52 Pack Acoustic Foam Panels 1" x 12" x 12" Sound Proof Foam Panles Soundproofing Noise Cancelling Wedge Panels for Home Office Recoding Studio with 300PCS Double-Side Adhesive
Soundproofing - Acoustic foam panels triangular grooves structure for better noise absorption, helps to reduce and absorb unwanted...
As an affiliate, we earn on qualifying purchases.
As an affiliate, we earn on qualifying purchases.
Why Acoustic Dampening Is Not the Same as Soundproofing — And Why It Matters
Most people buy foam thinking it’ll block sound. It won’t. Acoustic foam absorbs echoes and reduces reverb inside a room but doesn’t stop sound from leaking out or coming in.
Soundproofing involves sealing gaps, adding mass, and isolating vibrations. Think of it like a wall thick enough to keep noise from passing through. For a closet setup, understanding this difference stops you from wasting money on foam that won’t actually quiet your space.
Why does this distinction matter? Because investing solely in absorption materials can give a false sense of privacy or silence. If your goal is to prevent sound from disturbing others or entering from outside, you need to consider barriers and sealing strategies. Conversely, if your main concern is improving the clarity of recordings within your space, absorption is the key. Knowing which approach to prioritize helps you allocate your budget effectively and set realistic expectations about what each treatment can achieve. Combining both strategies—absorption to control internal reflections and soundproofing to limit leaks—provides the best overall result, but each has tradeoffs in cost, complexity, and space requirements.
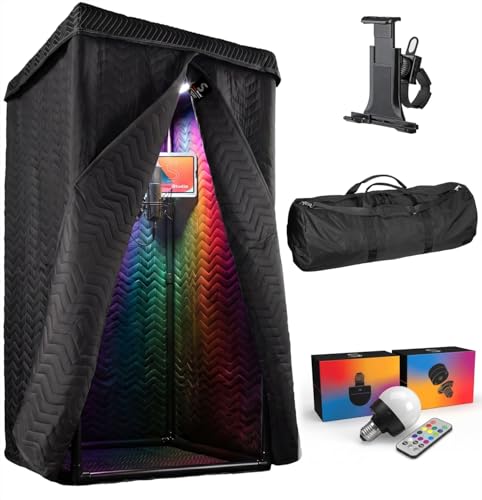
XL Ultimate Portable Vocal Booth for Recording & Voice Over, Reduces Echo
The XL Ultimate Portable Vocal Booth — bigger and heavier than the original with more sound absorption, more...
As an affiliate, we earn on qualifying purchases.
As an affiliate, we earn on qualifying purchases.
Where to Place Acoustic Treatments for Maximum Effect in a Closet
Placement is king. For detailed strategies, see where to place acoustic treatments for maximum effect in a closet. Instead of covering every inch with foam, focus on reflection points—mainly the wall behind your mic and the ceiling directly above it. These are the spots where sound bounces most and causes that hollow, 'boxy' vocal tone.
For example, a common DIY move is hanging blankets or foam panels at ear level and on the ceiling to tame early reflections. Corner bass traps can help reduce low-end buildup, but in tiny closets, broader wall coverage often matters more.
Why does placement matter so much? Because sound waves bounce off surfaces in predictable ways. Targeting these reflection points disrupts the internal echo path, leading to clearer recordings. Learn more about acoustic treatment techniques at attune magazine's guide on acoustic dampening. Improper placement—like randomly sticking foam on any surface—can be ineffective or even worsen sound quality by creating uneven absorption or dead spots. Strategic placement, especially at reflection points and at the mic’s head height, ensures that the treatments work with the room’s natural acoustics rather than against them. Additionally, maintaining some open space behind treatments prevents overly dead zones, which can make recordings sound unnatural or muffled. Remember, the goal is to reduce unwanted reflections while preserving some natural room sound for a natural, professional tone.

Aokeo Microphone Isolation Shield, Foldable Mic Shield with Triple Sound Insulation, Reflection Filter with 3/8" and 5/8" Mic Threaded Mount for Recording Studio, Podcasts, Singing, and Broadcasting
The Microphone Isolation Shield features a sound-proof foam front and a ventilated metal back panel to eliminate noise...
As an affiliate, we earn on qualifying purchases.
As an affiliate, we earn on qualifying purchases.
How to Handle Doors, Floors, and Ceilings — The Hidden Weak Spots
Doors are the main sound leaks in a closet. Sealing gaps with weatherstripping or hanging heavy blankets can dramatically cut transmission. For floors, a thick rug or foam mat underneath the rig absorbs vibrations and reduces noise transfer.
The ceiling often gets overlooked, but adding foam or a soft layer can reduce reflections bouncing down from above. For a DIY approach, hanging a quilt or foam tiles from the ceiling can help tame that echo.
Why are these weak spots so critical? Because sound escapes or enters most readily through gaps and unsealed surfaces. Even small openings around door frames or vents can significantly undermine your efforts at sound isolation. Properly sealing these weak points creates a more controlled acoustic environment, preventing external noise from seeping in and internal sound from leaking out. Additionally, treating the floor and ceiling addresses the full acoustic picture: untreated floors can transmit vibrations, and untreated ceilings can reflect sound downward, both impairing clarity. Balancing these treatments ensures your recordings remain focused and free from unwanted ambient noise or echo, making your setup more professional and reliable. Visit Ash Grind's safety standards for acoustic setup for more info.

TroyStudio Portable Vocal Booth, Large Foldable Microphone Isolation Shield, Music Recording Studio Sound Echo Absorbing Box, Desk & Stand Use Reflection Filter with Thickened Dense Acoustic Foam
【BASIC INFO】: Inside size after setup: 8'' (L) X 10'' (W) X 12'' (H), large space for various...
As an affiliate, we earn on qualifying purchases.
As an affiliate, we earn on qualifying purchases.
Corner Bass Traps or Wide Wall Coverage? What Works Best in Tiny Rooms
| Option | Effectiveness | Ease of Installation |
|---|---|---|
| Bass Traps in Corners | Reduce low-frequency buildup, especially in small rooms where standing waves are common. They target the room’s bass modes, which can cause muddiness and boominess in recordings. However, over-reliance on corner traps alone can leave mid and high frequencies untreated, leading to a less balanced sound. | Moderate; requires fitting into corners, sometimes with special mounting. They can be bulky, which might be a challenge in tight spaces. |
| Wider Wall Coverage | Softens reflections and reduces boxiness, often more noticeable in small spaces. Covering larger wall areas with foam or blankets creates a more uniform absorption, improving clarity across the frequency spectrum. While less targeted at bass, this method often yields a more natural sound overall. | Easy DIY; hang blankets, foam, or quilts on large sections of wall. This approach provides a broad, effective treatment with minimal complexity. |
In tiny closets, broad wall coverage often beats corner traps alone because it addresses multiple frequency ranges simultaneously, reducing overall reverberation and echo. For DIY tips, see Astrophotography HQ's guide on acoustic placement. Combining both methods—placing bass traps in the corners and covering main walls—can optimize sound quality, but space constraints may limit options. Prioritize broad coverage first, then add corner traps if low-end issues persist. This layered approach balances bass control with overall clarity, ensuring your recordings sound full and natural without excessive muddiness or echo.
DIY vs. Professional: Building a Quiet Closet Rig on a Budget
DIY solutions can work wonders. Layered blankets, moving pads, and thick curtains are quick fixes that cut noise and reflections. For example, hanging a few thick blankets at door gaps and on the walls can cut sound transmission by 20-30 dB. The key is understanding tradeoffs: DIY methods are affordable and quick but may lack the precision and durability of professional treatments. They often require frequent adjustments and may not last as long, but they give you immediate control over problematic reflections and leaks.
For more permanent builds, flexible foam panels (2-inch thickness for small rooms) and bass traps behind the mic can significantly improve clarity. These treatments are designed to absorb a wide range of frequencies and create a more controlled acoustic environment. While more costly upfront, they reduce the need for constant tweaking and can last for years if installed properly. Combining DIY methods with strategic placement of professional-grade panels often yields the best results within a limited budget. Remember, the goal is to balance cost, effort, and effectiveness—sometimes a layered approach using both DIY and professional treatments offers the best value and performance.
Pro tip: always test your setup with a recording before sealing everything up. Small tweaks—like repositioning foam or adjusting blanket coverage—can make a noticeable difference in sound quality. Regular testing ensures your treatments are working as intended and helps you avoid over- or under-treating your space.
Frequently Asked Questions
What’s the difference between acoustic treatment and soundproofing?
Acoustic treatment reduces reflections and echo inside a space, making the sound clearer and less boxy. Soundproofing blocks sound from passing through walls or doors, preventing noise from leaking in or out. They serve different purposes but work best together for a quiet, professional setup.
Where should I place acoustic foam or panels in a closet booth?
Focus on reflection points—mainly behind your mic, the ceiling directly above, and the door area. Placing foam at ear level and on the ceiling reduces echoes and improves clarity. Avoid covering every surface; strategic placement is more effective.
Do I need bass traps in a closet, or is wall coverage enough?
In very small spaces, broad wall coverage with soft materials often reduces both high and low-frequency issues better than corner bass traps alone. However, adding bass traps in the corners can help if you notice low-end buildup or muddiness.
How thick should acoustic panels be for a small closet?
2-inch thick panels are usually sufficient for small rooms, especially when layered or combined with other treatments. Thicker panels (4-inch) are better at absorbing bass and low frequencies but are less necessary unless you experience significant low-end issues.
Should I treat the door, and how do I do it cheaply?
Yes, treating the door is crucial. Hang blankets, quilts, or thick curtains over it, and seal gaps with weatherstripping or draft stoppers. These simple steps can cut sound leaks by significant margins without much expense.
Conclusion
Transforming a closet into a quiet, effective recording space isn’t about fancy treatments alone. It’s about smart placement, sealing leaks, and giving your gear enough room to breathe. Think of your closet as a blank slate—you control the noise and the sound.
If you focus on the essentials—distance, reflection control, and ventilation—you’ll create a spot that sounds professional without spending a fortune. Your best recordings are just a few smart tweaks away. Ready to turn your closet into your new favorite studio?